Plugin Development
Note
Please see our Development Policy before beginning development.
Overview
Emby Server runs on two different runtimes: .NET Core 2.0+, and Mono. The following instructions will show you how to build one plugin that will run on all platforms supported by Emby Server.
Getting Started
First install Emby Server, and get it up and running. Install Visual Studio 2017 or later along with the .NET Core SDK.
The easiest and recommened way is to use one of the Plugin Templates which are provided as part of the Emby SDK.
For example, with the Simple UI Plugin template, follow these steps:
- Copy and open the
EmbyPluginSimpleUI.slnsolution in Visual Studio - In the Plugin class, replace all the indicated values with your own
- Rename the
EmbyPluginSimpleUIproject in Visual Studio to a name of your choosing. This will also change the file name - Adjust the namespaces in the plugin classes accordingly
Create a Post-Build Event
Right click the project -> Edit Project. At the bottom before the Project closing tag, add a copy command to copy your plugin to the server's plugin folder. For example:
  <Target Name="PostBuild" AfterTargets="PostBuildEvent">
    <Exec Command="copy $(TargetPath) %AppData%\Emby-Server\programdata\plugins\" />
  </Target>
Test the Plugin
Shutdown the server, rebuild your solution, and restart the server. At this point you should see your plugin in the Dashboard's Plugins menu.
Add Functionality
To add real functionality to your plugin, you will need an entrypoint that can initialize and accept the various dependencies you may need in order to interact with the Emby environment.
This is done by creating a class that implements the IServerEntryPoint interface.
See Automatic Type Discovery for this and other types you can include in your plug-in. Its constructor can accept any number of injected dependencies - depending on what your plugin needs to access.
See also: Dependency Injection.
If your plugin will be a premium plugin, see IRequiresRegistration in Other Interfaces.
In addition, use these Emby interfaces when applicable:
- IFileSystem
- IHttpClient
- INetworkManager
- @MediaBrowser.Model.Diagnostics.IProcessFactory
- IZipClient
Debugging
Setup
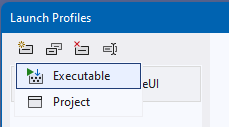
For debugging your plugin running in Emby Server, you need to create a launch target in Visual Studio. Start by opening "Debug Properties":

Create a new profile of type "Executable":
and rename it to "Emby Sever".
Next, enter the path to Emby Server and its containing folder as "Working Directory":
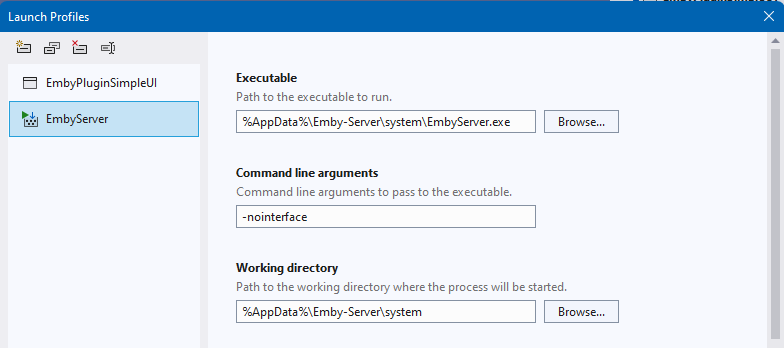
The command line argument -nointerface disables the Emby tray icon.
Running
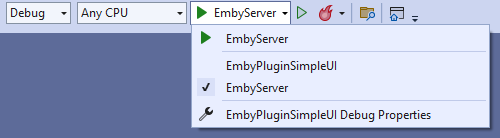
To run Emby Server and debug your plugin, you need to select the newly created target:
Now you're ready to run!
Note
Create a breakpoint in the constructor of your plugin to be sure that it's all set up and working.